Workflows Approvals Part 2
Absence & delegation
If you are an approver and you will be away for an extended period of time, you or your tenancy admins can set a delegate to under-take the approvals while you are away. Once set, the delegate will receive approval notifications instead of you.
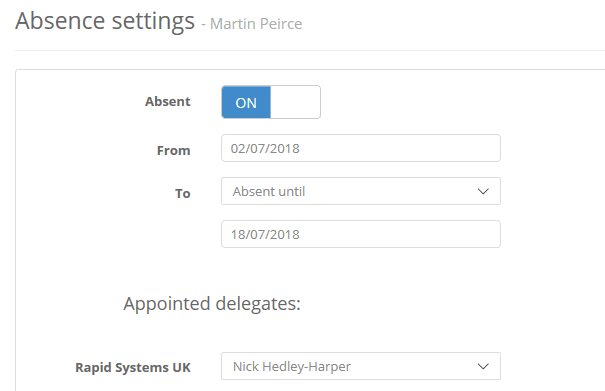
To set your own absence settings, look for the help icon and on the drop down list choose Absence Settings.
Firstly, enable the absence and set the dates you are away.
For every Business Unit you belong to, you have the option of setting the delegate. A delegate will only appear in the dropdown list if they are designated an approver – they have the approval role. If they don’t appear, the tenancy admin needs to provide them with similar roles and permissions to you.
Once you are all set, click Save at the bottom.
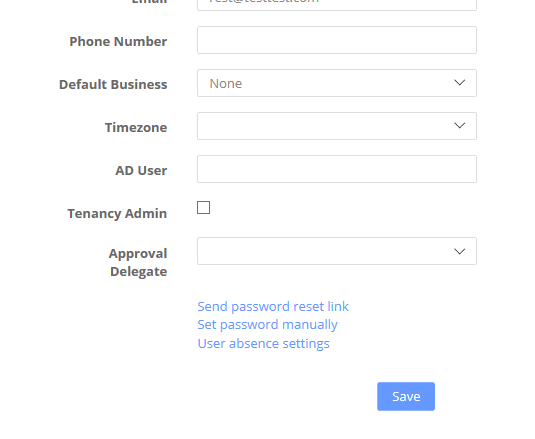
If your approver goes on Safari for three months and forgets to set his delegate, fear not. You can set this yourself. Head into the user settings in Admin >Settings. Find the user in the list and click their name. You will then see the following:
Click the link at the bottom – “User Absence Settings” and set the approval delegate for them.
Approval Delegate
With this feature we are answering the question “Can I stop someone approving their own purchases”. Example, you want to prevent the CEO from raising a purchase request for $500K and approving it themselves. To do this you enable the feature in Business Settings >Purchase Orders
“Prevent users from approving their own purchase orders”
Then for each user, you set their Approval Delegate in their user settings. Perhaps for the CEO you set the CFO. To do this, edit the users settings and choose the delegate from the drop-down list where you see the words “Approval Delegate” as shown below.

This means, very simply, when set, Zahara will bypass the originator in the approval list and go onto the next approver. If our person here is the last approver in the workflow, we will use the delegate instead.
Sending PO to The Supplier
- Send as a workflow step
- Send from within the order using the send email icon
- Download a copy of the PO and send it yourself
1 & 2 above have an audit trail behind them and the ability to have links in the email that ask the supplier to accept or reject the order so these are our suggested methods. A typical process though is where you want to let the buyer know that the order is approved and that they can send the PO off themselves. There is no way to send a copy of the PO to the buyer in an email. You can send the buyer an email and provide a link to the order. This would be achieved by adding a “send email” step to your workflow. You can provide as much information as you like about the Order using the placeholders and the links.
Best Practice
The best solution is to add a “send purchase order to supplier” step at the end of your purchase order approval. This step has the ability to “CC Originator” – this is in effect what you want to do. This method gives you a good audit-trail and shows you if the order was accepted by the supplier (add the relevant placeholder to your supplier email template). Just make sure your suppliers email addresses are all up to date
Automatic Invoice Export
One of the available invoice approval steps is to export this invoice. This step needs to be after an approval step and will only work with QuickBooks Online, Xero & SmartSync & MYOB exports. As you would expect, once the workflow hits this step, it will export the invoice.
Export to FileDirector
Secure Approval Requirement
Mandatory Approval Comments

Approval Reminder Email

Approving - How to Approve

Skip Duplicate Workflow Steps
Related Articles
Approvals FAQ
FAQs How can I tell if something is approved? You will see a green icon if a document has gone into a workflow and been approved. What does a grey approval icon mean? This means a document hasn’t actually gone into a workflow. You can set the Default ...Coding Approvals
There are times when you need your approvers to also code an invoice or an order as part of the approval. Coding can include the Account code (ledger/nominal), the Cost Code or the Project code. You can create an approval set that requests/demands ...Workflows & Approvals
Approvals sit at the Division level and Divisions are designed to be flexible; but are really the natural groupings of people in your organization. If you are a typical business with Marketing; Sales; HR then the Divisions would be perfect for this. ...New Approvals
Introduction Approval workflows are administered from the Divisions. Divisions are found under the Business menu. Workflows can be created for both Purchase Orders and Invoices. There are a number of steps that you can add to a workflow, and each ...Division Management
Divisions are the natural groupings of people inside your organisation. These are your teams or departments. This is probably the most important part of Zahara because here in one place you have: Departmental user management Creating and editing ...

