Adding Users & Setting Permissions
Adding & Managing Users
Your license with Zahara is for named users. This means if you need to register a new user, you need to make sure your license count will allow for a new user. If you are taking a trial, the you have unlimited users for the first 30 days so add as many as you require.
To add a new user, and to see the Admin > Settings menu, you need to be a tenancy admin. This is enabled on a user by user basis under the users main settings.
Go to the Admin > Settings menu.
You have two choices – Wizard or Manual.
The key thing to remember, here is that once a user is created, they need to be assigned to a Division, so Divisions must be created first.
Your process then for adding users is:
- Create your Divisions
- Add or import your users
- Assign users to a Division
- Set the users role – like Buyer or Approver
- Fine tune any permissions
Adding Users Manually
Add your users First Name, Last Name, Email & Job Title.
There is a spare field called AD User – ignore this for now.
The only additional option here is to “Suppress Registration Email” – If you switch this to on, the user will not receive their registration email – where they will set their password.
You can send this at a later date. Click Create
Assign Permissions
You now have to assign a membership and permissions
There are three principle sections of the user management – Users, Divisions, and the right hand-side with the Business Units.
The first step is easy, click a user or multiple users in Box one and tick a Division box below – then click Add
The users will now be assigned to the Divisions. Next up, move over to the right hand side panel and expand out your Business Unit to reveal your divisions as shown below:
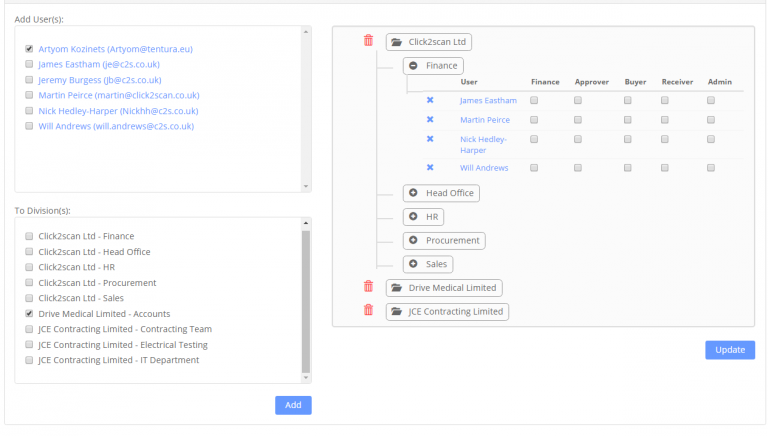
(To reveal the Divisions, click on the Business Unit name – in the example above, click where it says “Click2Scan Ltd”)
Now assign a role.
When you click the role tick box, certain permissions are set. The role also provides a different dashboard. Read the article on Roles – you have a choice of
- Finance – Will receive a finance dashboard tab and elevated permissions in line with a Finance team member
- Approver – Gets the approval dashboard tab and typical permissions for an approver
- Buyer – Get the buyer dashboard tab
- Receiver – Assumes this person is going to check in orders
- Admin – Provides elevated permissions and extra functionality – usually, only provide to actual Admins of Zahara
Remember to click Update at the bottom – as shown above.
Individual Permissions
If you click a users name – anywhere you see it in this section, you will be taken into their individual record where you can edit their details and their permissions. You can also set their password manually, or their absence settings.
- Restricted Viewing – A useful feature so the user can only see the things they create
- Restricted Buying – Stops a buyer typing out a free line item – they can only choose products available to the supplier.
Related Articles
Permissions & Roles
Admin > Settings > User Membership Individual Permission Sets Each user can have their permissions individually tailored for their entire Zahara access. You achieve and edit this by clicking their name in the user section to get to the options shown ...Troubleshooting Users
These are the typical user issues Problem Response The user cannot login but they are a registered user The user account has been created but the user hasnt been assigned to a Divison or provided with a role. Check their assignment, role and ...Assign a user to a Division
Admin > Settings Once you have a user created, you need to assign them to a Division. A Division belongs to a Business Unit Example Marketing Team @ Widgets Inc To do this you click your user and then the relevant division as shown below: In this ...Exporting Invoices - Controlling permissions
You can control who can export invoices. Without this permission, the export button will not appear. To do this, go to Business > Settings > Validation and page down to the section shown below. Choose the people in the list. You can multiple select ...Restricted Viewing
Restricted Viewing When setting a user’s permission, there is the option for “restricted view” This setting means the user will only see “their stuff” – meaning the orders or invoices they have originated. This is an added security layer to stop ...